Deployment steps
Introduction
1. Deploy your infrastructure (only if you self-host Marble)
If you choose to self-host Marble, the first will be to deploy it on your own infrastructure.
You can find the deployment guidelines on our GitHub.
2. Define your data model
Once you have access to Marble, the first step is to define your data model. You will find a detailed introduction on the creation of the data model here.
Marble provides an Example data model, which you can customize according to your requirements. While your data model can evolve over time, be mindful that making breaking changes (such as removing or renaming objects and fields) will require more effort.
Your defined data model will have two significant impacts:
- It will determine the schema of the objects your developers need to send to Marble later (so it needs to closely "match" your product's internal data model)
- It will influence how compliance officers write rules (so it needs to resonate with typically less-technical, more-business-oriented teams)
Marble can assist you in organizing workshops to ensure that this crucial step works for you in the long term.
Throughout the rest of this walkthrough, we'll assume that you're using the Example data model, which includes the following objects:
- Users
- Accounts
- Transactions
3. Import your historical data
Now that you have setup your data model, it's time to populate your Marble instance with actual data.
We usually recommend to upload 1 to 6 months of past data for transactions and events, and all your data for accounts or customers. Note that the maximum file size when uploading a csv is 32MB: if your files are too large, you can just import a sample of them at this step, and upload your full data via API later.
For a detail explanation, look at Ingesting data
Before uploading your CSV file, keep in mind:
- Not all fields (columns) may be required depending on your data model.
- Dates should be entered in the ISO8601 format, e.g., 2025-10-04T14:04:49Z.
- Field names are case sensitive.
4. Build your first scenarios, rules and workflows
Create your scenario
Once your data model is ready and filled with some first data, you can start building your first rules!
Let's suppose you want to create a scenario to evaluate the risk of your outgoing transfers:
- Go to Scenarios
- Click on New scenario
- Name it Outgoing transfers review for example
- Select transactions as the trigger object and save the new scenario
In the scenario's trigger page, we'll limit our analysis to transactions with a type = "transfer"and direction = "debit".
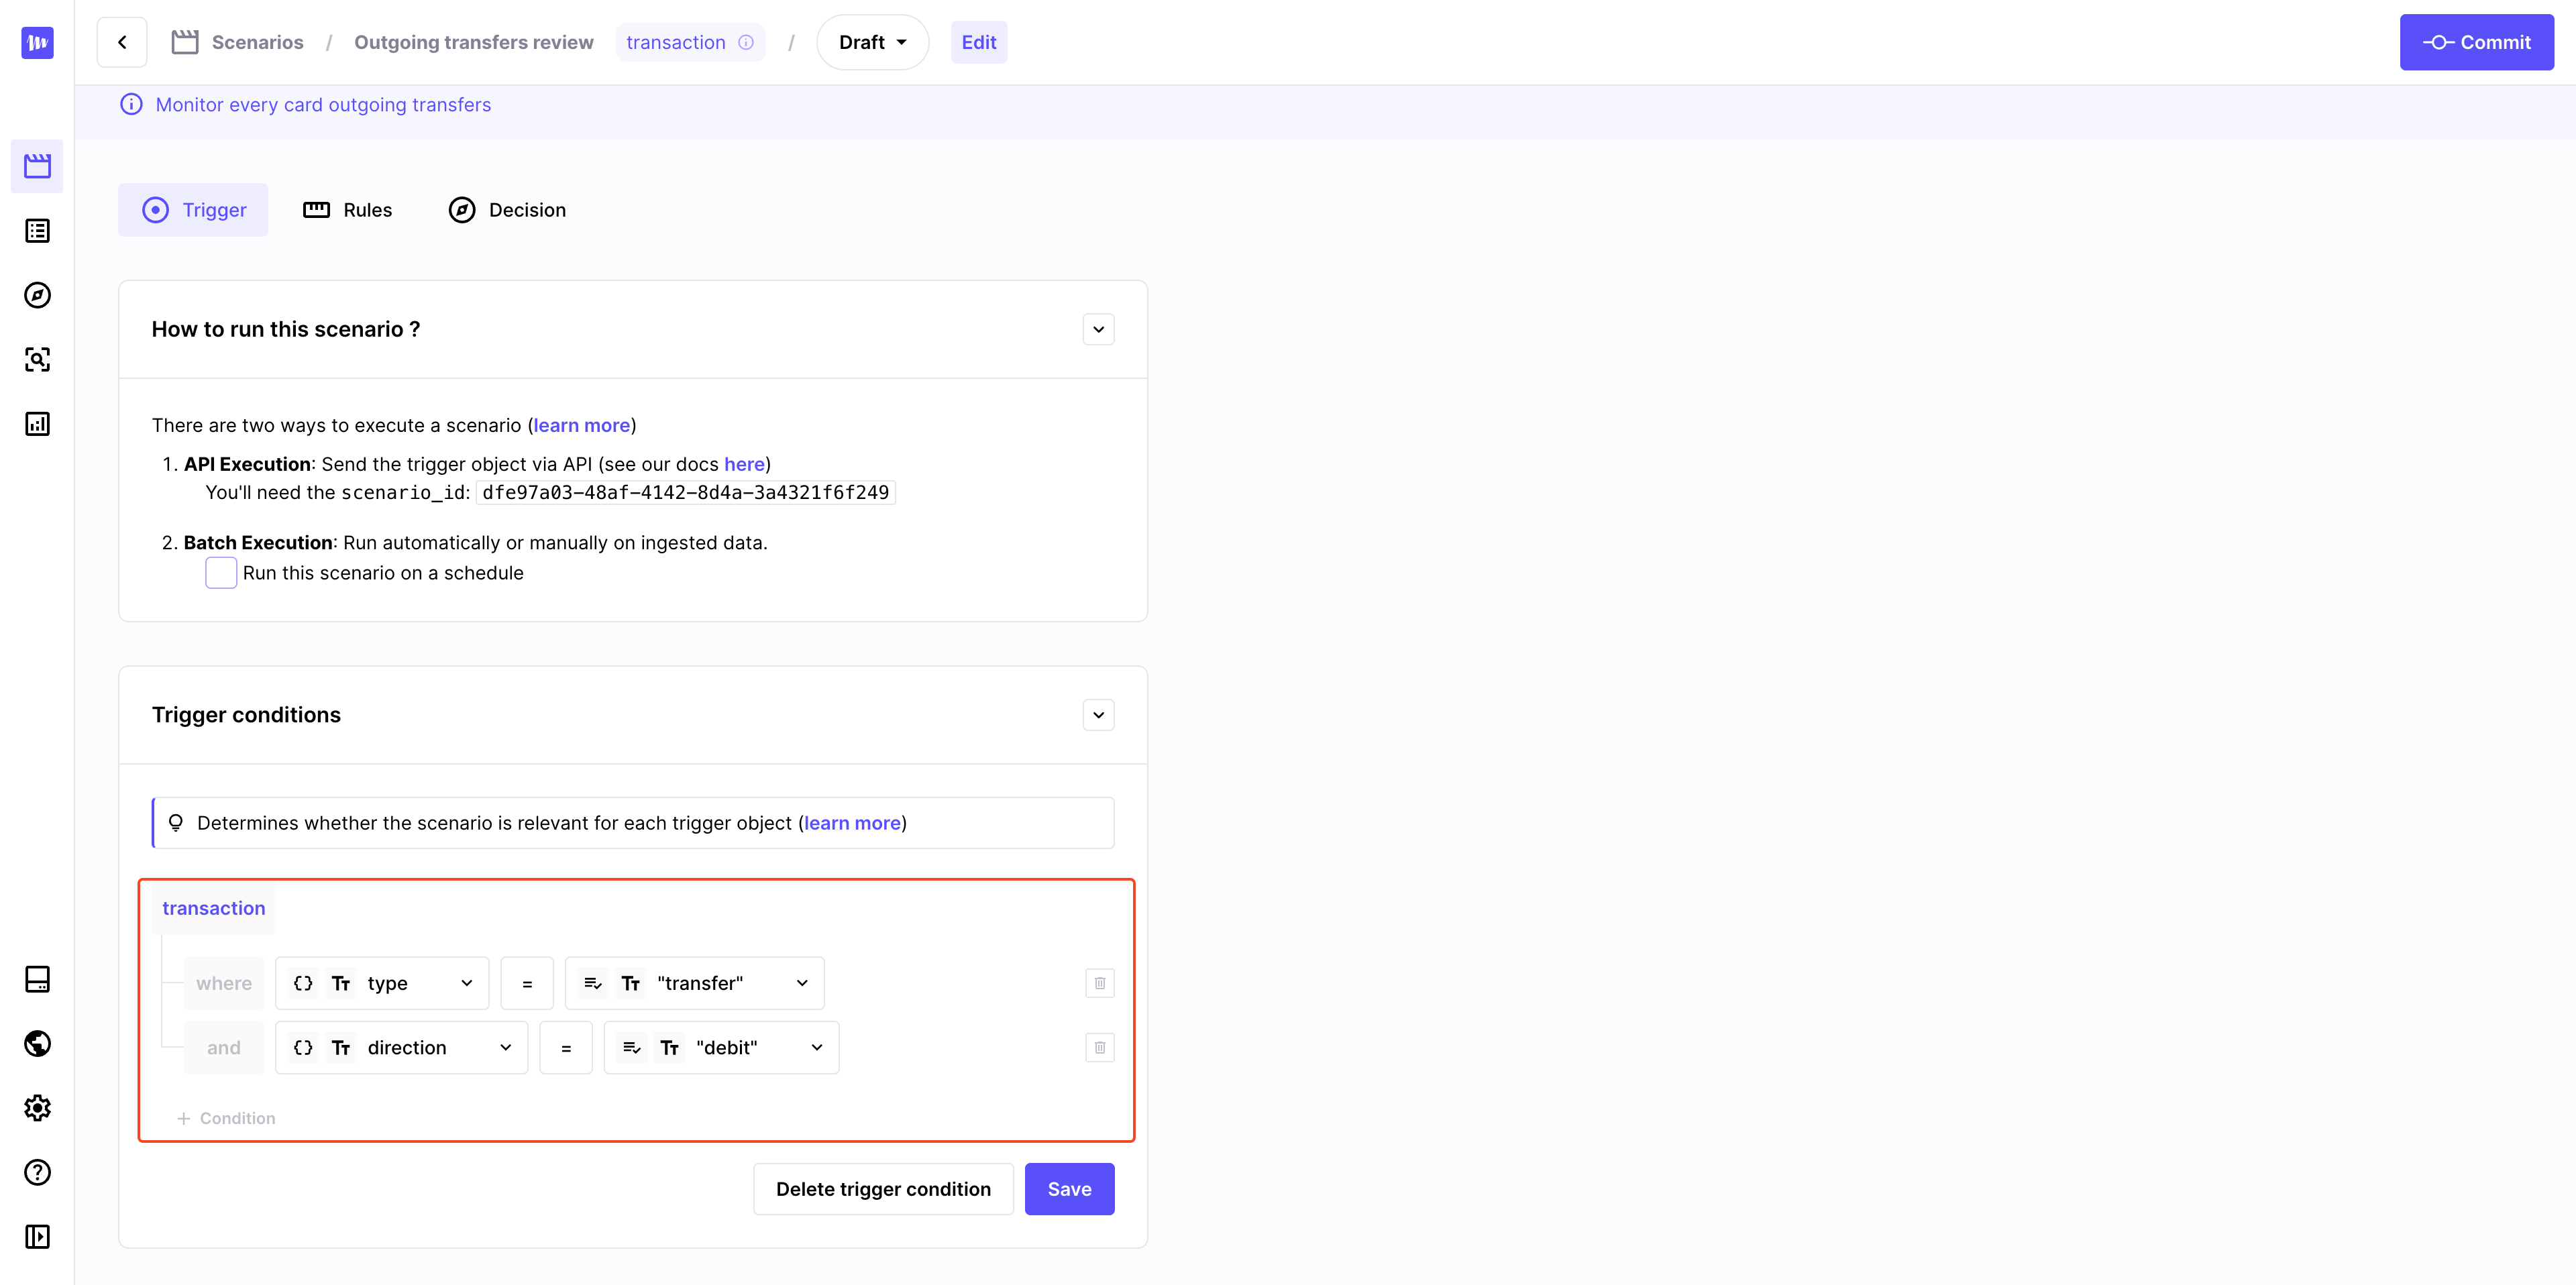
Only objects that match the scenario's trigger conditions will be evaluated
Build your first rules
You can now move to the Rules tab, where we will create these first 3 rules:
- Check if the transaction exceeds $10,000.
- Check if the transaction was made in a prohibited country.
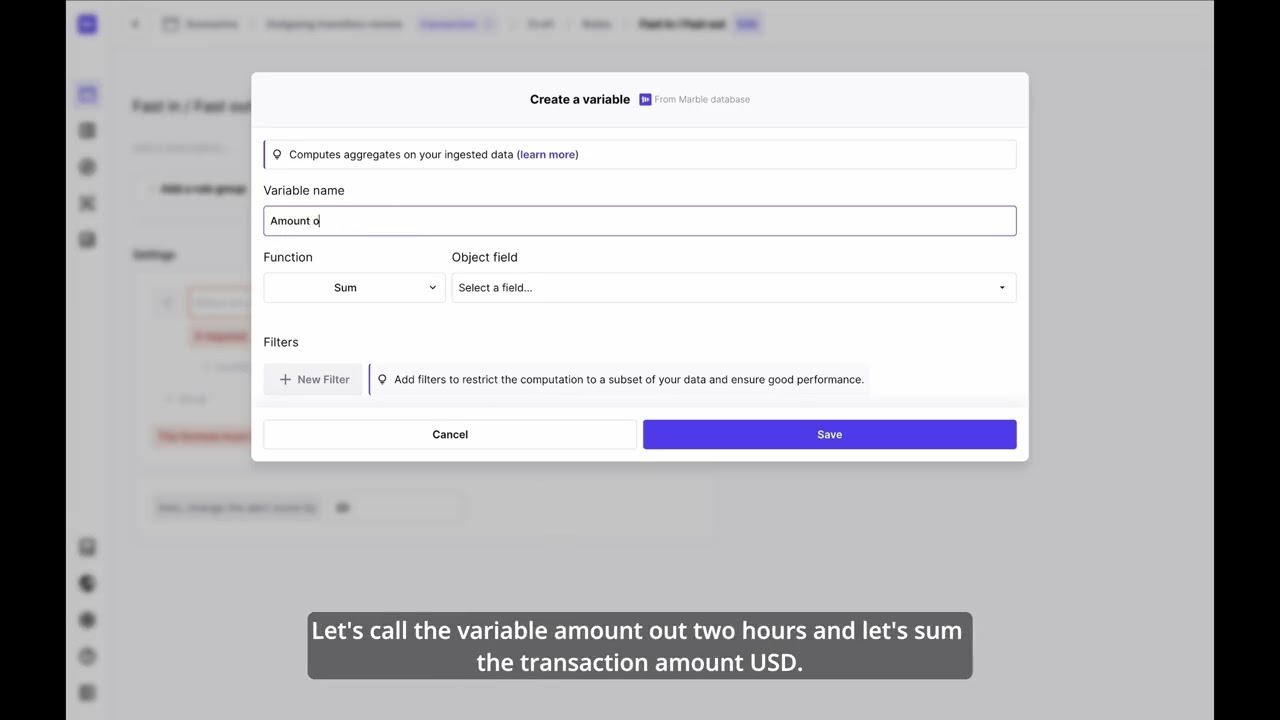
- Check if the total amount of outgoing transactions matches the incoming operations in the last 2 hours.
The video below will walk you through the creation of these 3 rules:
Once your rules are ready, you can switch to the Decision tab to configure the threshold of each outcome.
Set up your workflow
You are almost ready! Before moving forward to the APIs implementation and creating your first decisions, you should set up your scenario's workflow. This will allow you to automatically add your new decisions to an existing case or a new one based on your criteria.
Before setting up your workflow, make sure that you added a decision group to the triggering object in your data model. You can find more details about this in Grouping decisions.
In our example, we chose to group decisions on transactions by Users.
To set up your scenario's workflow, follow these steps:
- Go to Scenarios → Your scenario (here Outgoing transfers review)
- Click on New workflow in the Workflow section
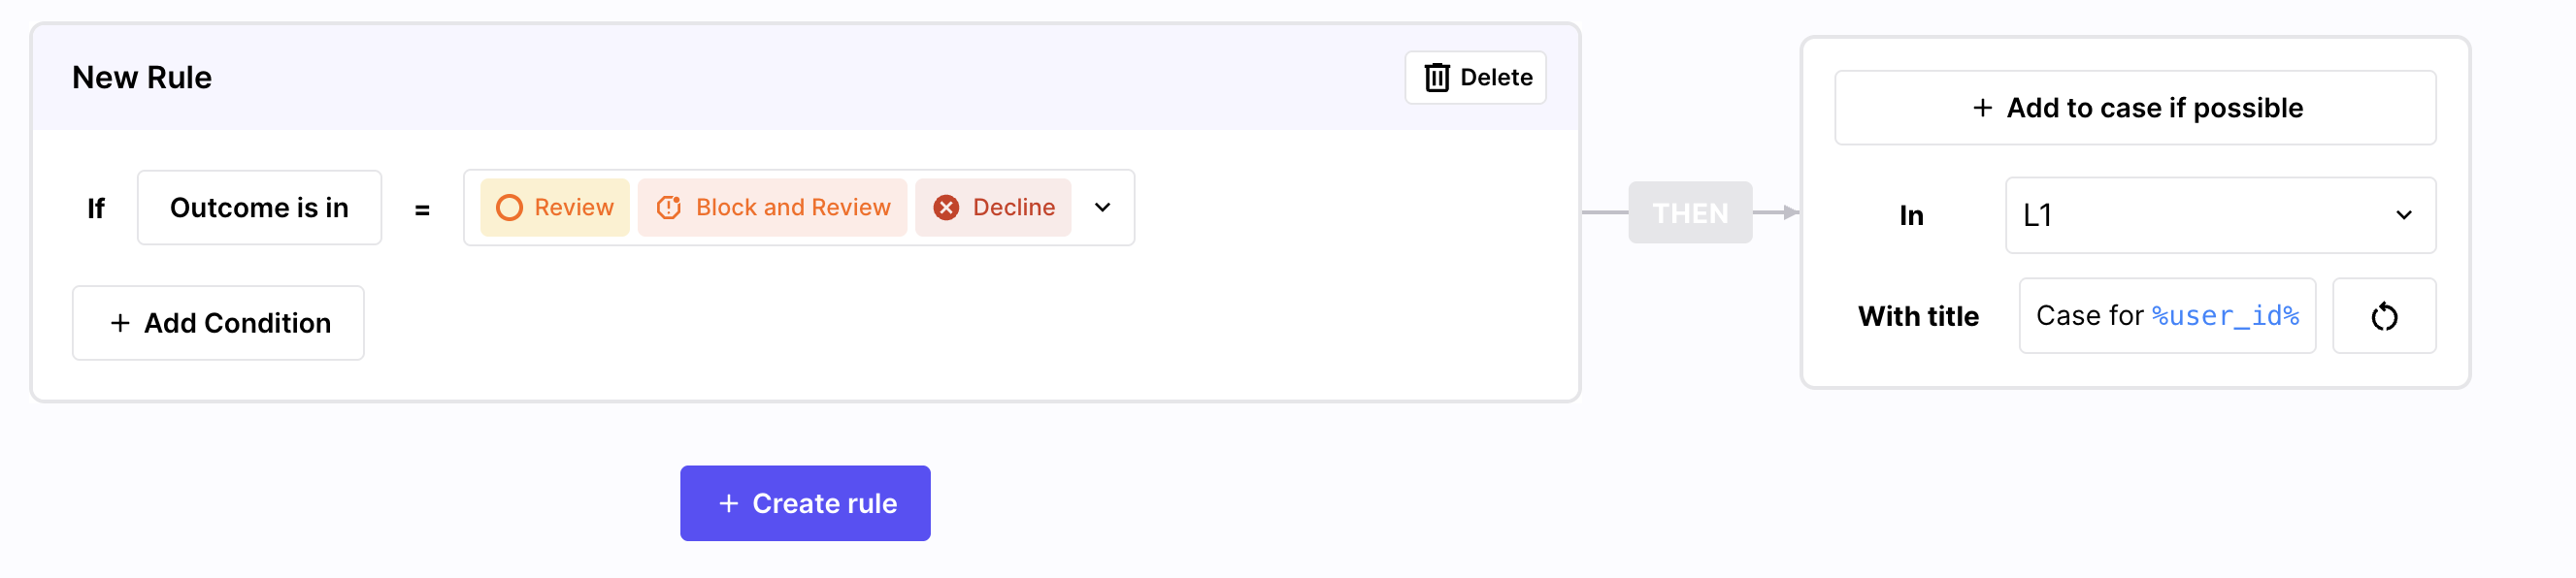
- Click on Create rule then add the condition Outcome is in and select outcomes Review, Block and review and Decline
- On the right of your screen click on Do nothing and select Add to a case if possible
- Create your inbox and define the names of the cases to be created
- Save the rule
Manage your cases using the workflow
This workflow will add all decisions that have an outcome other than Approve to an existing case for the user, or create one if there is not any.
You have many other options in the workflows, that you can discover on Workflows.
5. Set up and test your APIs
Your scenario is now ready to be tested. In our example, we are going to set it up for real-time decisions, but note that you can also have it running on a schedule: you can find more information about these two options on this page.
For real-time decisions, you will run your scenario by API:
- Create your API key from Settings → API
- Copy your
scenario_idby clicking on it in your scenario → Trigger → API Execution - Call the Decisions API fro your scenario, as described in the API Reference
- Ingest the object you just got a decision for, as described in the API Reference
Note that, in the case of a real-time scenario, we strongly recommend that you first call the Decision API, then ingest the object, as explained in the chart below.
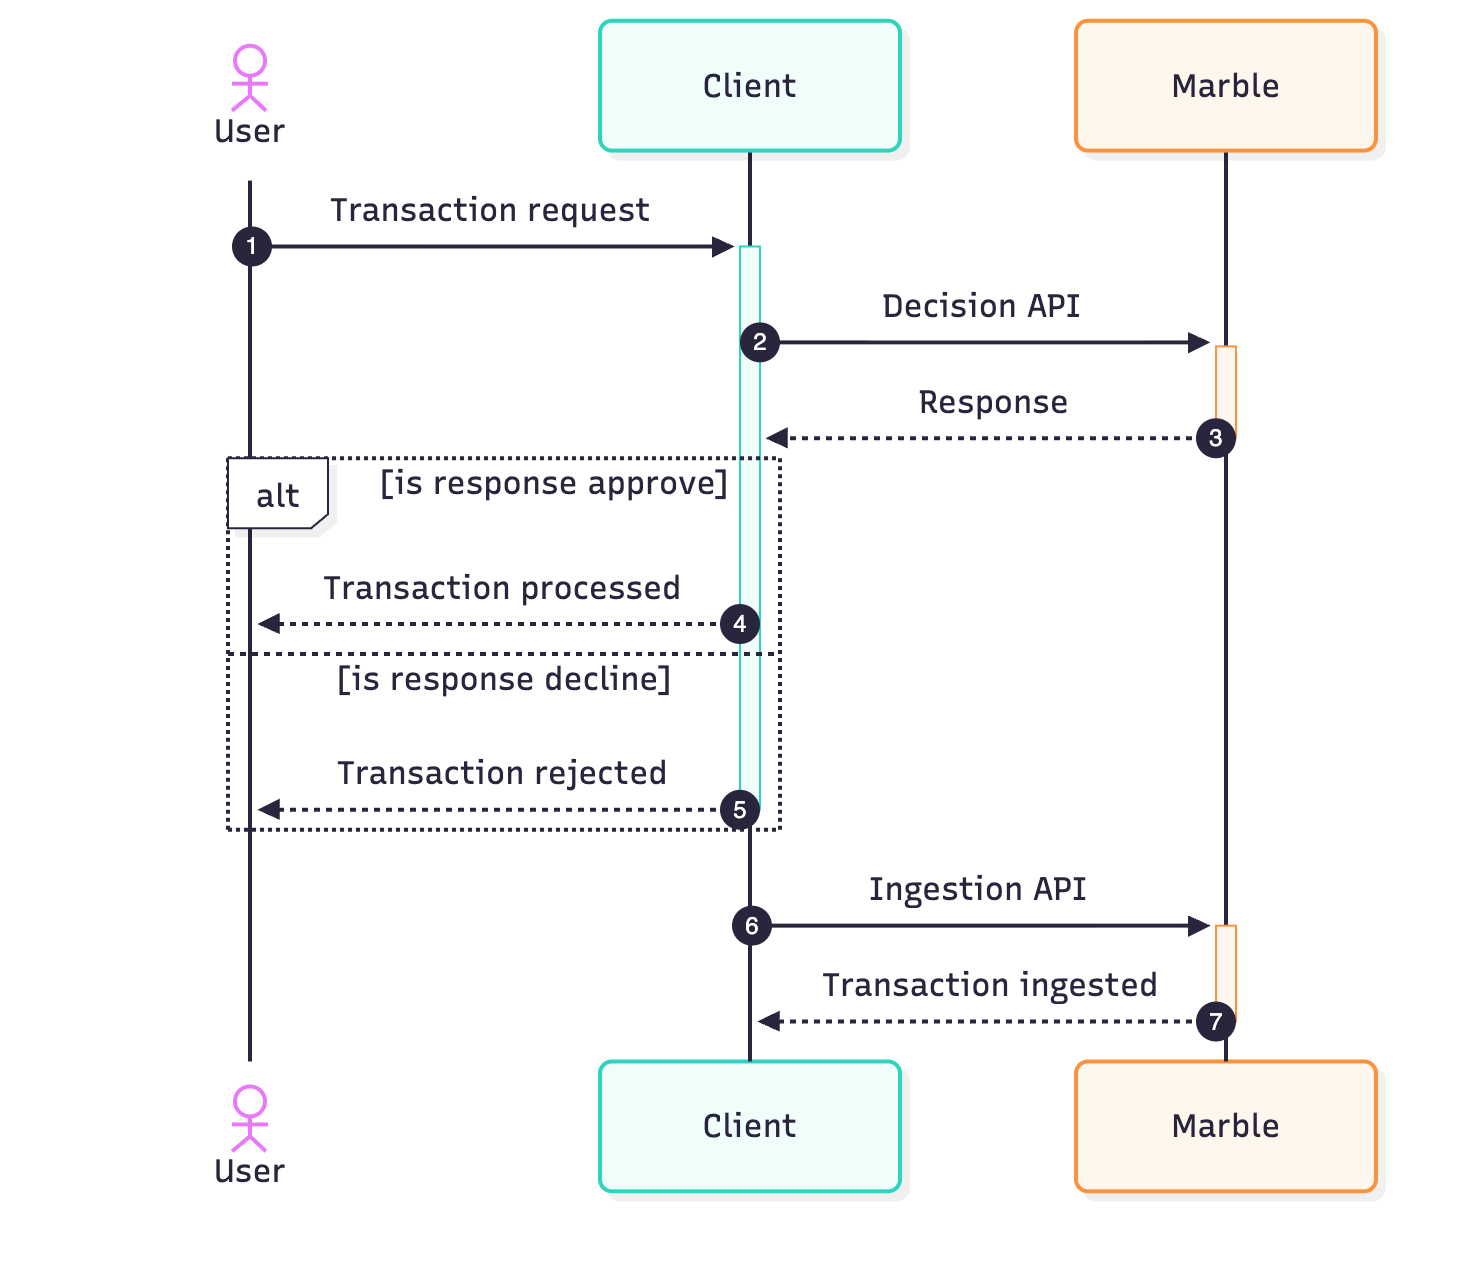
When using real-time decisions, you should call the Decision API before the Ingestion
6. Test and optimize
Before going live, you just need to make sure everything runs well. We recommend that you:
- Prepare a test book to make sure your whole flow works well and the rules are properly configured
- Run some charge tests, if you are self-hosting Marble
- Run your rules on your past data to make sure you can with the volumes of alerts, and adapt your rules in case you cannot
Once you validate these tests, you are ready to go!