Implementing Marble at My Company
In this document, we'll deep dive into a typical implementation of Marble.
More specifically, we'll look at:
- Scoping the project: there are a few options, from a basic POC, ready in half a day, requiring no direct integration (but some manual work), to a fully integrated setup making unlimited decisions in real-time.
- The work required to make each step a success
Scoping the Marble integration
Marble's integration end goal is to make real-time decisions. For example, choosing to accept or decline a credit card payment based on the transaction itself, but also other data points you have on that user (for example, past transactions, customer profile, and adjacent events).
This end goal should be kept in sight, but we suggest building your integration iteratively, starting with lower-scale use cases. Here are the 3 steps we usually recommend:
- Proof-of-concept : Manual CSV loading, user-triggered or batch processing
- First integration : API based ingestion with batch or user-triggered processing
- Complete integration : API ingestion with real-time, API triggered processing
Let's dive further into each phase.
1. Proof-of-concept phase
In this phase, we're really focusing on setting up Marble & making your first decisions, instead of the logistics of a full integration.
- All data will be imported manually, by uploading .csv files in the Marble UI
- All decisions will be triggered by schedules or with a manual start from our dashboard (not real-time API calls)
- Decisions will be retrieved by downloading them from the Marble UI, or within our case manager.
This behaviour is well suited for less time-sensitive activities, such as:
- Weekly & monthly user & transaction reviews, or post processing activities
- Comparing new scenarios results with an existing system you may already have in place
Let's get started:
Picking the implementation team
As with any other project, you'll need a team that's in charge of the implementation. Typically, you'll want the following roles in the team:
- Champion : They'll drive the implementation to success, coordinating stakeholders and tech teams. Usually, that will also be Marble's first user, from the compliance team.
- Compliance or risks: someone in charge of the risk framework, that will actively contribute to the detection scenarios
- Tech lead : Ideally in charge of (or at least fluent with) the part of your stack that handles transactions, and/or the current tool used for monitoring them.
- A Project/Product Manager : They will be able to scope and prioritize the work needed to integrate Marble.
Defining your data model
The first step to work with Marble is to define your data model. Feel free to have a look at the introduction to Marble's data model.
Marble provides a "sensible defaults" data model, but you can customize it any way you want, based on your needs. Your data model can evolve in time, but remember that making breaking changes (removing/renaming objects & fields in your data model) will be a more complex endeavor.
The data model that you define will have 2 major impacts:
- It will dictate the schema of the objects your developers will need to send to Marble later (so it needs to closely "match" your product's internal data model)
- It will dictate how compliance officers write rules (so it needs to resonate with typically less-technical, more-business-oriented teams)
Marble can help you organize the right workshops to make sure this key step works for you in the long term.
If the data model you'll use is different than the default one, an admin can set it up in the Marble UI. If deeper modifications need to happen, the Marble team can also jump in !
For the rest of this walkthrough, we'll assume that you're using the standard data model, documented here. For reference, it features the following objects:
- users
- accounts
- transactions
Uploading your first dataset
Now that you have setup your data model, it's time to fill your Marble instance with actual data.
For eg, we'll upload some accounts because we're interested in account reviews in this first iteration.
Open the "Your Data" page, scroll to "accounts", then click "Add data". Here, you'll be able to download an empty .csv file with all the columns ready for you, per the data model you've set up.
At that point, you'll likely want to export some data from your product or analytics database.
Fill in the .csv, keeping in mind that:
- depending on your data model, not all fields (columns) are required
- dates need to be entered in the ISO 8601 format. Eg : 2023-12-04T14:04:49Z
- strings should ideally be entered surrounded by quotes
Just be careful with Excel, it tends to break a lot of formats!
Writing your first set of rules
When you have an agreed-upon data model and some data uploaded, you're ready to start the compliance work!
Writing the first set of rules is as easy as creating a scenario in the Marble UI, and adding rules to it. During this POC phase, we'll use Marble without any technical integration, instead relying on manual data upload.
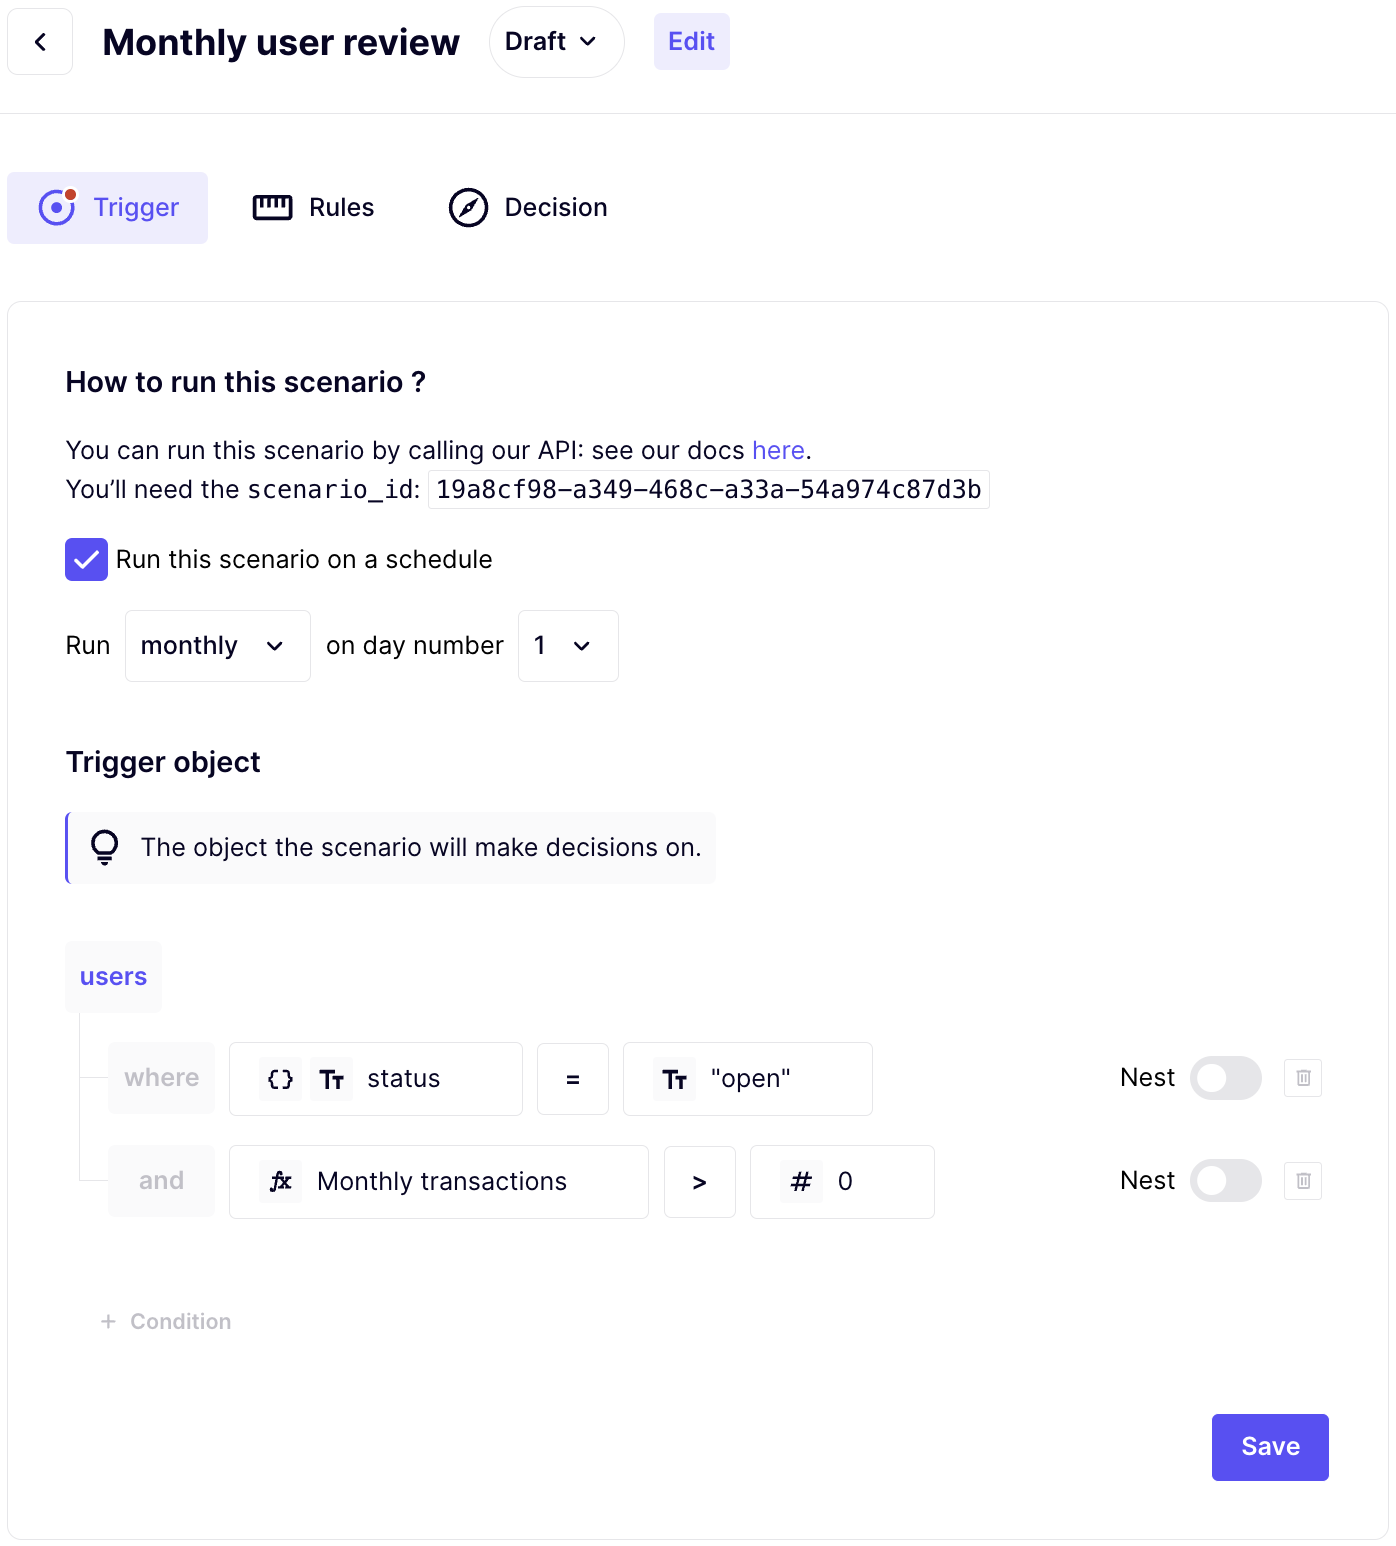
Let's work on a new scenario that is not time-sensitive: Monthly user reviews.
We'll want to check for multiple things:
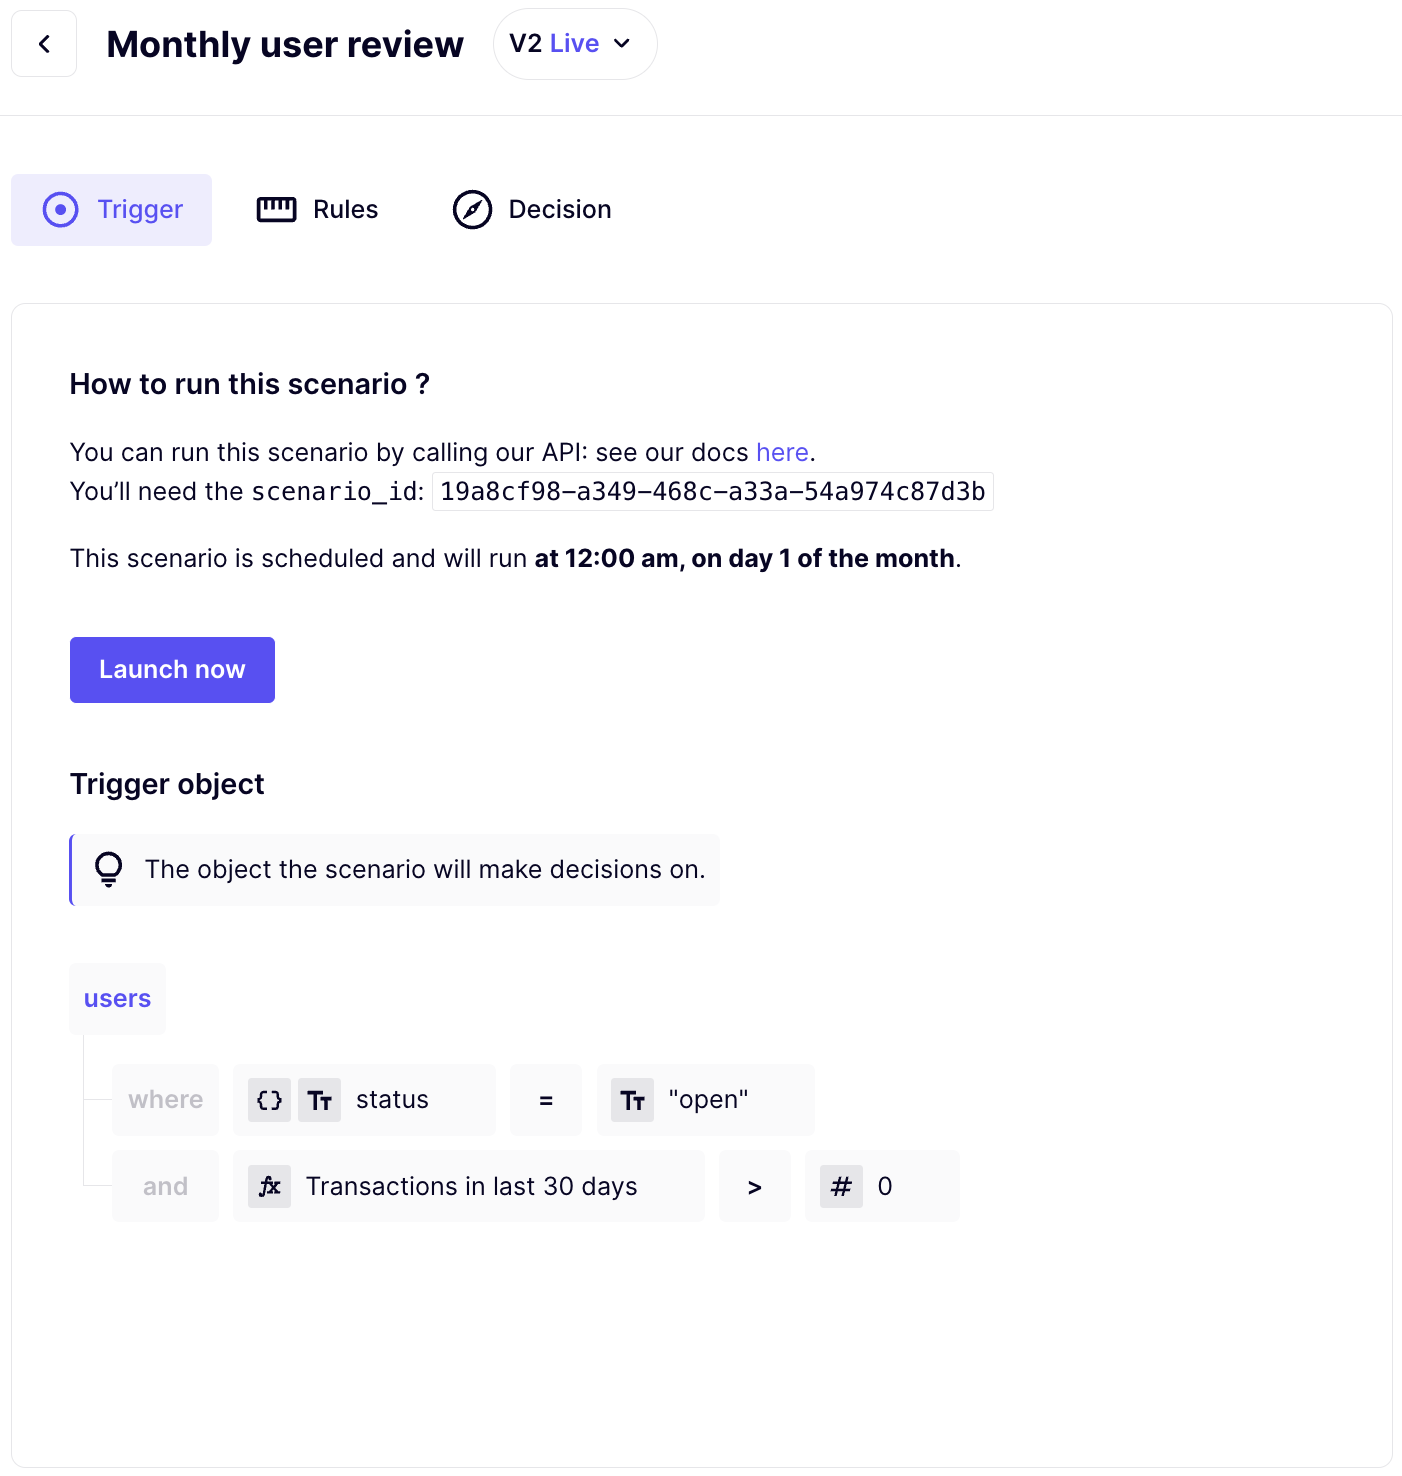
In the scenario's trigger page, we'll limit our analysis to users in the "open" status that emitted at least a transaction in the last 30 days
We'll implement a few simple rules:
- Check if at least a transaction is above 150 000€
- Check if the total amount of this month's transaction is 150% x the previous month's total amount
- Check if at least a transaction was sent to a blacklisted country
- Check if the user has been a customer for more than 2 years
For the first one, "at least a transaction is above 150 000€", we'll define a Variable that counts the number of transactions in a month :
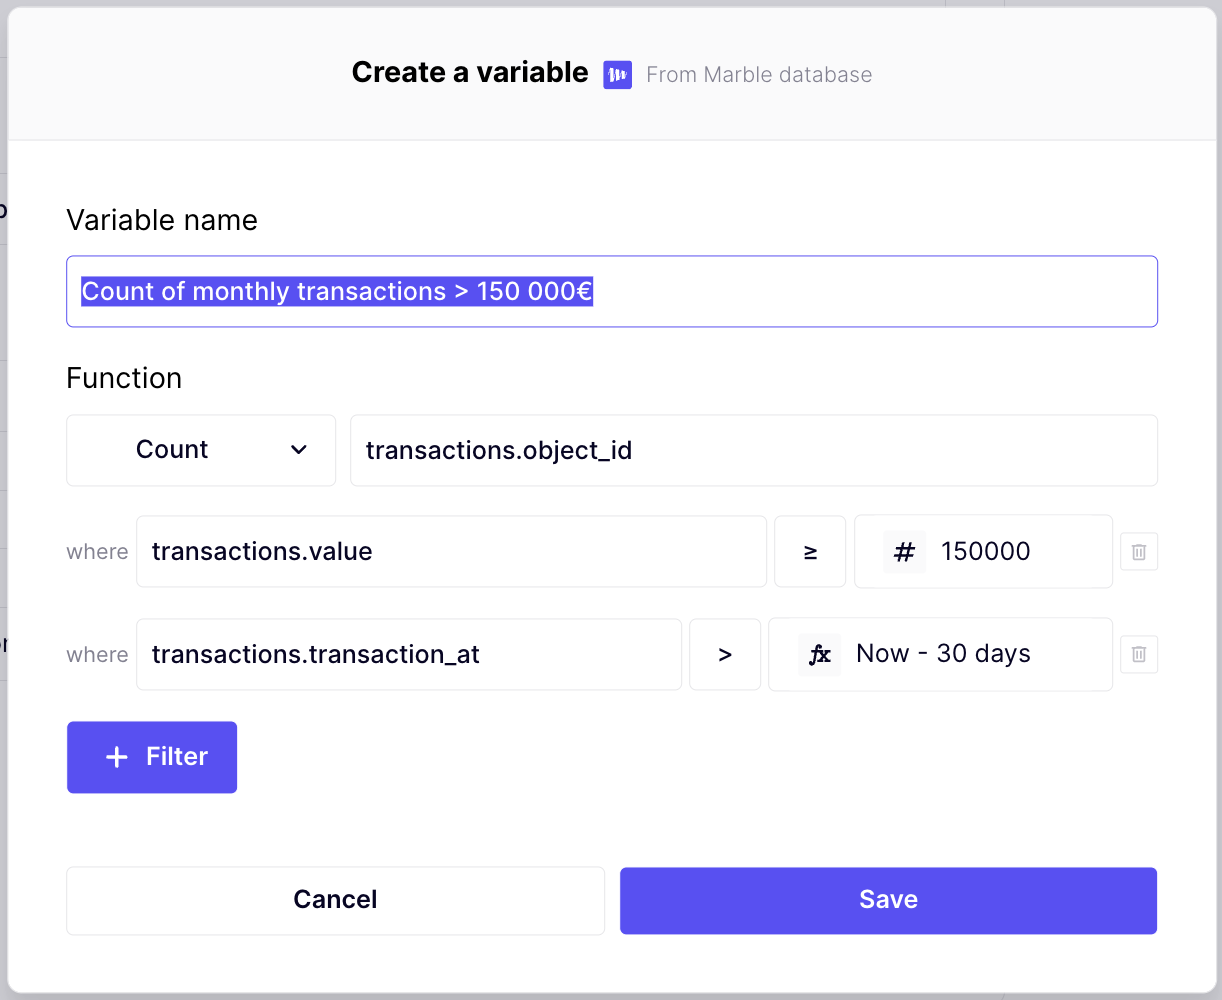
Then we'll use that count in a simple rule :
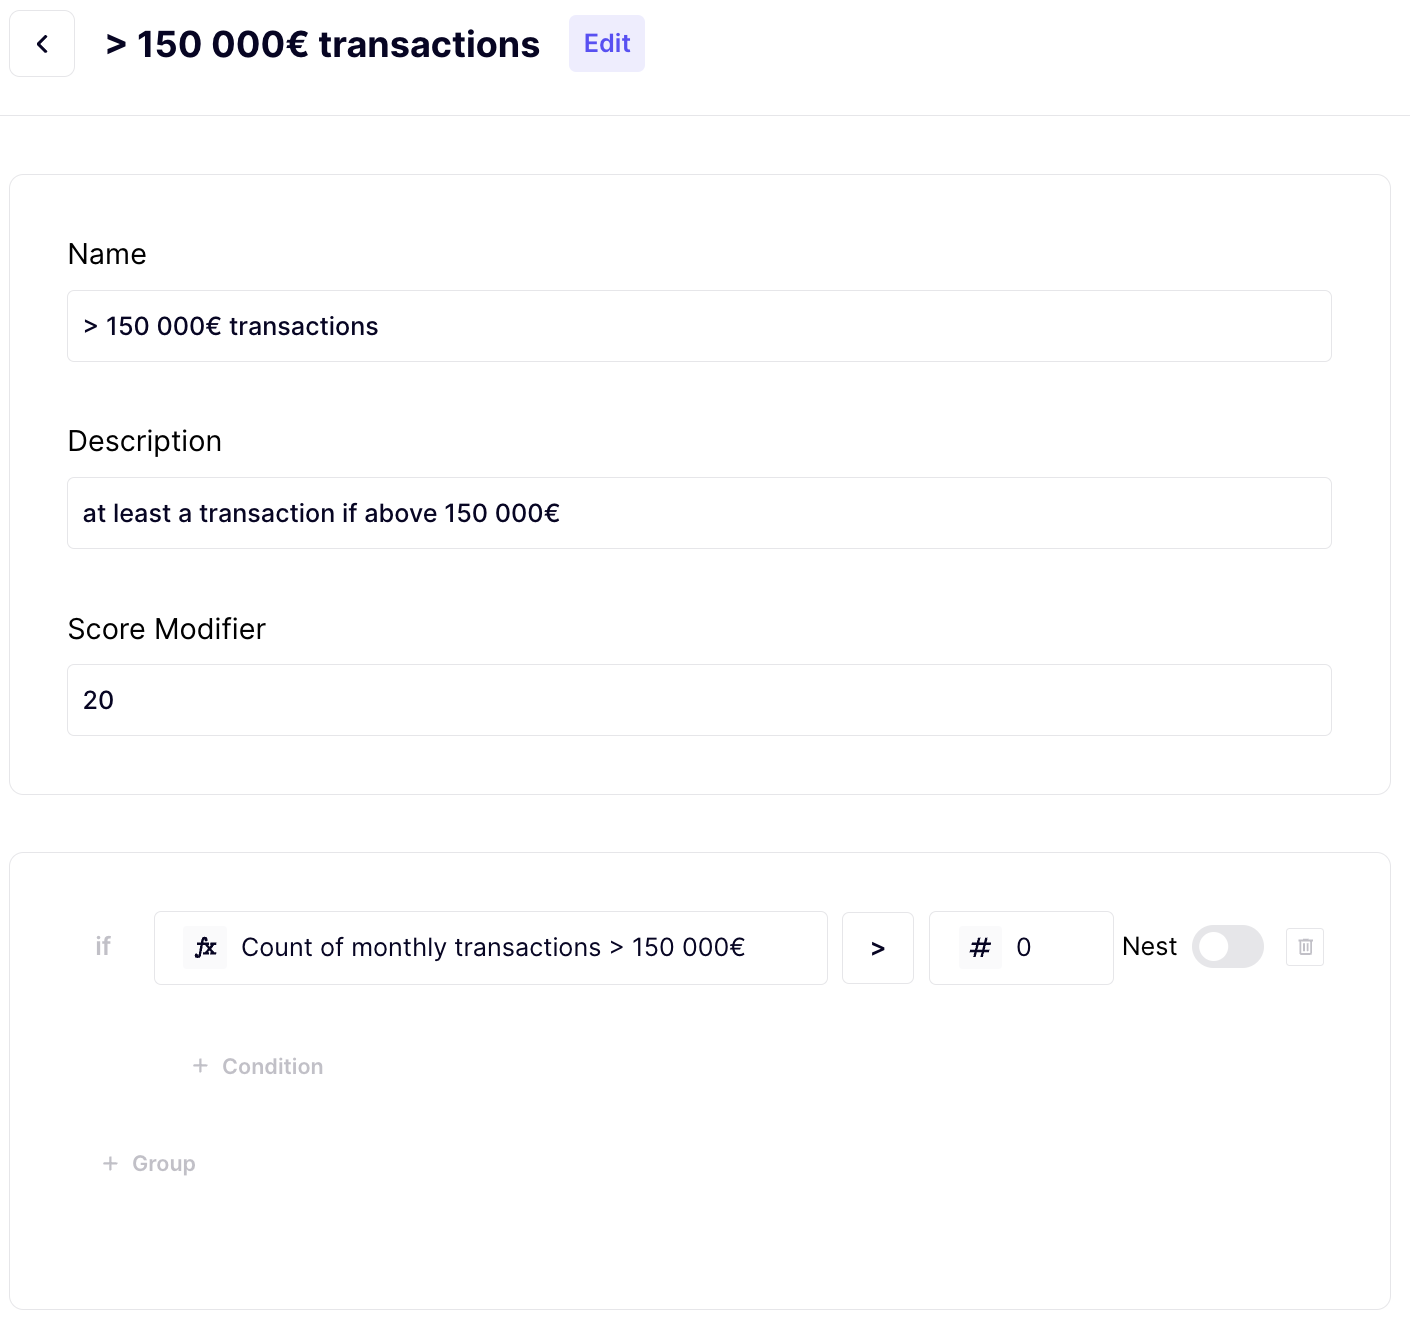
Following the same process, let's create all rules:
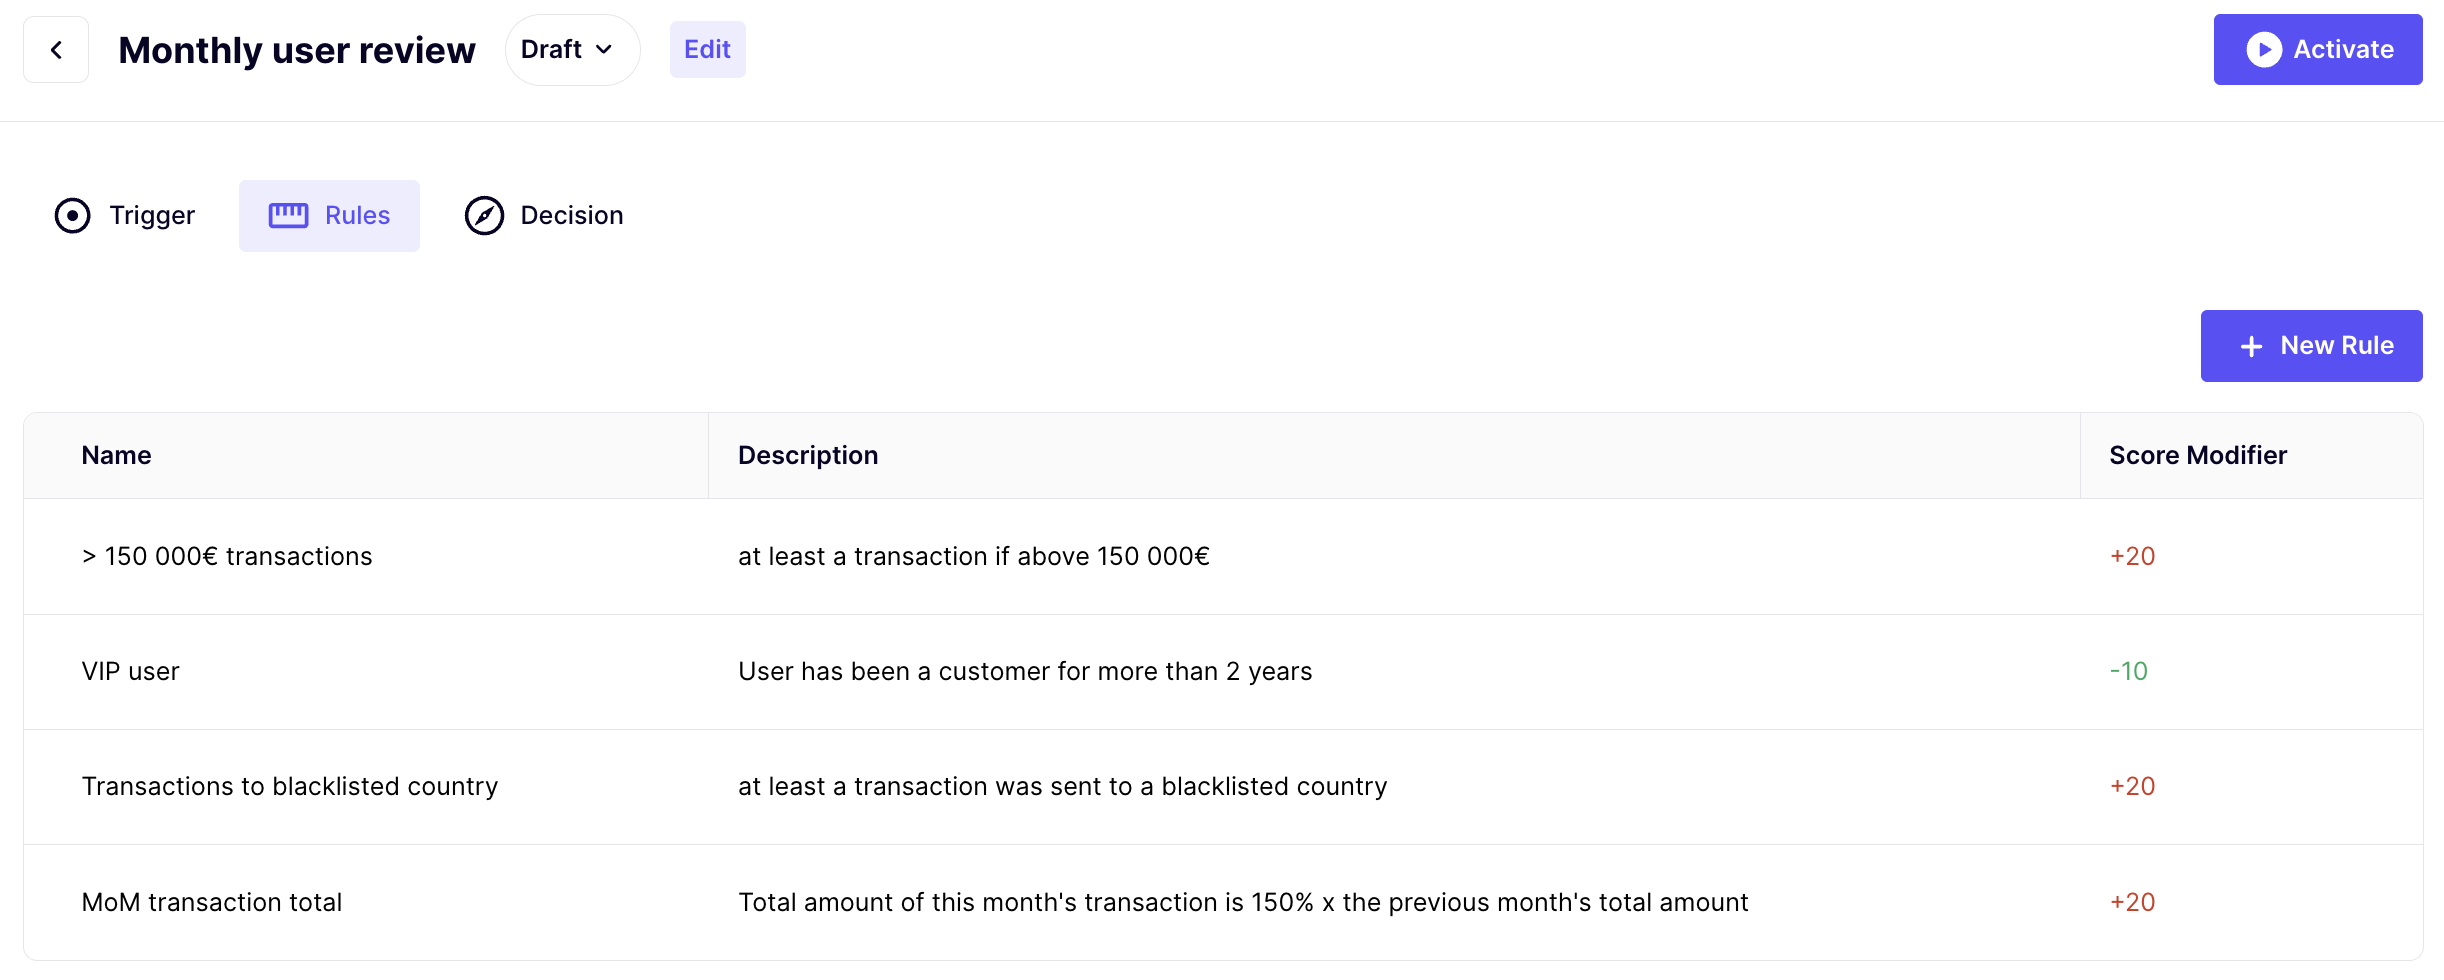
You'll note that the last one ("user has been a customer for more than 2 years") has a negative score, ie it reduces the risk score associated with the decision.
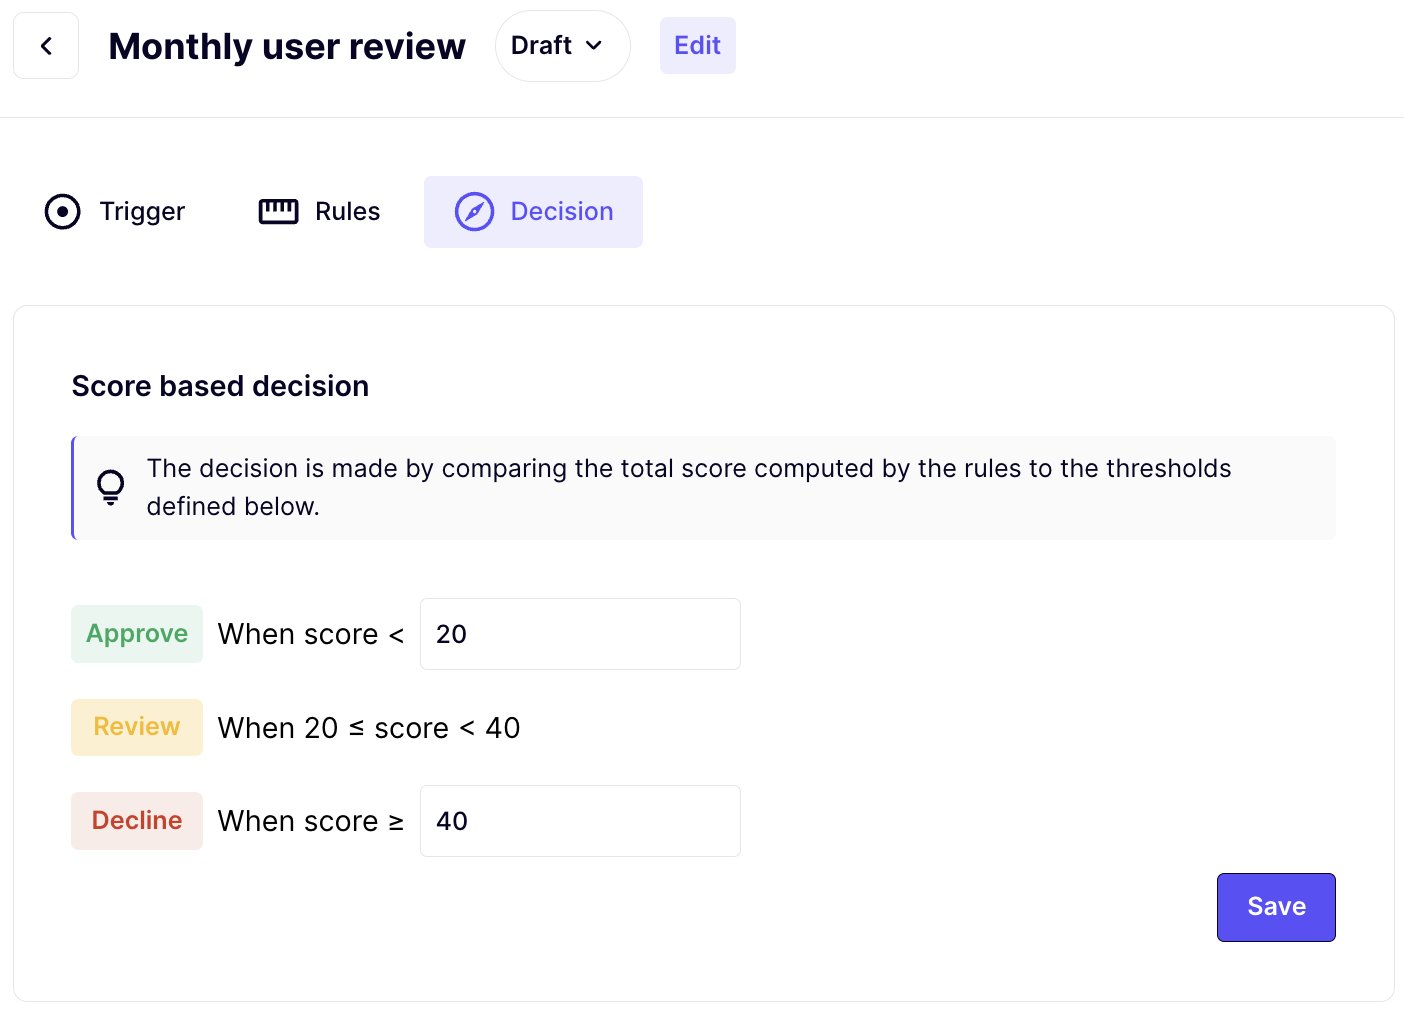
To finish off this scenario, let's configure our thresholds. We want the decision for a specific user to be "Declined" if at least one rule is true, so we'll use the following settings:
The last step to make decisions on your users is to setup a schedule. We want to review those users on a monthly basis, so we'll simply set it to run every month, on the first day of the month.
Don't forget to Activate your scenario, as it is now only in a draft state.
You may be eager to receive your first batch of decisions: Simply click "Launch now", and Marble will launch a batch in the next few minutes (there's a minimum 1-minute delay before the batch starts running).
Processing decisions
Your first batch of decisions should be ready any minute now. Head to the "Scheduled executions" page, where you'll be able to download your decisions.
Decisions can be downloaded in a newline-delimited JSON, where each line represents a single decision. From here, you can process each decision manually as you see fit. At this stage, you're likely going to check those in a tool like Excel.
You can also view and investigate the decisions in our Case manager
Recap
For this proof of concept, we've successfully chosen a data model, uploaded the matching data, crafted a useful first scenario, and actually checked accounts!
2. First integration
Now that Marble is helping make decisions for your company, we'll automate the manual work to push data to Marble, and retrieve decisions.
- All data sent to Marble will be done by API calls to our Ingestion API
- All decisions will continue to run on a schedule.
- Decisions will be retrieved automatically
This makes it perfect for implementing more serious use cases, like:
- Close, regular review of objects (users, transactions ...) run once or several times per day
- Post transaction reviews
- Rotating reviews based on team schedule
Let's get started :
Automated data entry
As you've noticed in the POC phase, data entry was manual. This makes the process highly dependent on the person actually exporting and importing data. Let's fix this and automate this step.
This time, you'll need to involve your tech team: have them look at the ingestion API. This is the API that you can use to send updates to Marble when things change in your system. For example, every time a user is updated, or makes a transaction, you'll want to make a call to the Ingestion API.
Because this API needs to receive objects that conform to your specific data, you'll also find an auto-generated API documentation in your Marble UI that takes your data model into account here
There are a number of ways to go through this implementation, which are highly dependant on your software architecture and available infrastructure. Feel free to get in touch with us at that point if you're unsure of "where" to implement this.
For reference, we've seen users implement this at the core banking and ORM levels (almost real-time when events happen), as well as leveraging data pipelines.
Automated decisions retrieval
At this point, we're generating batches of decisions automatically. We've eliminated the need for a single person to send data to Marble, but we're still depending on someone to log in to Marble and download the decisions, and start processing them in their tool of choice.
Marble can automatically push batch decisions to an S3 bucket of your choice. This lets you automate decisions processing easily:
- Get in touch with Marble to setup your S3 bucket. We'll need to coordinate to make sure Marble can access a bucket from your infrastructure.
- All batch decisions will be published to this folder as soon as the batch is completed.
- From here, you can easily process those files. A popular choice would be using lambdas/cloud functions that read the file, and send the data to the tool or team responsible for handling the decisions.
For reference, we've seen users push decisions to a ticketing system like Zendesk, or update their CRMs, like Hubspot.
You can also use our integrated case manager to manage all investigations within Marble
Recap
At this point, Marble is producing decisions regularly, without human intervention. Those decisions are then published in your infrastructure, and are dispatched according to your needs.
From here, you can make this integration evolve to fit more and more use cases, until you eventually reach the point where you're looking for real-time decisions.
3. Last mile
It's now time to focus on real-time decisions. We'll keep our existing asynchronous decisions, and use the real-time decisions API to make decisions that are time sensitive.
- Some decisions will continue to run on a schedule.
- Some decisions will be run in real-time, to trigger specific actions in your product.
This means that we'll unlock use case like:
- Real time transaction monitoring, in the critical path of the transaction
- Live user monitoring, during or post onboarding
Let's get started:
A Real-time scenario
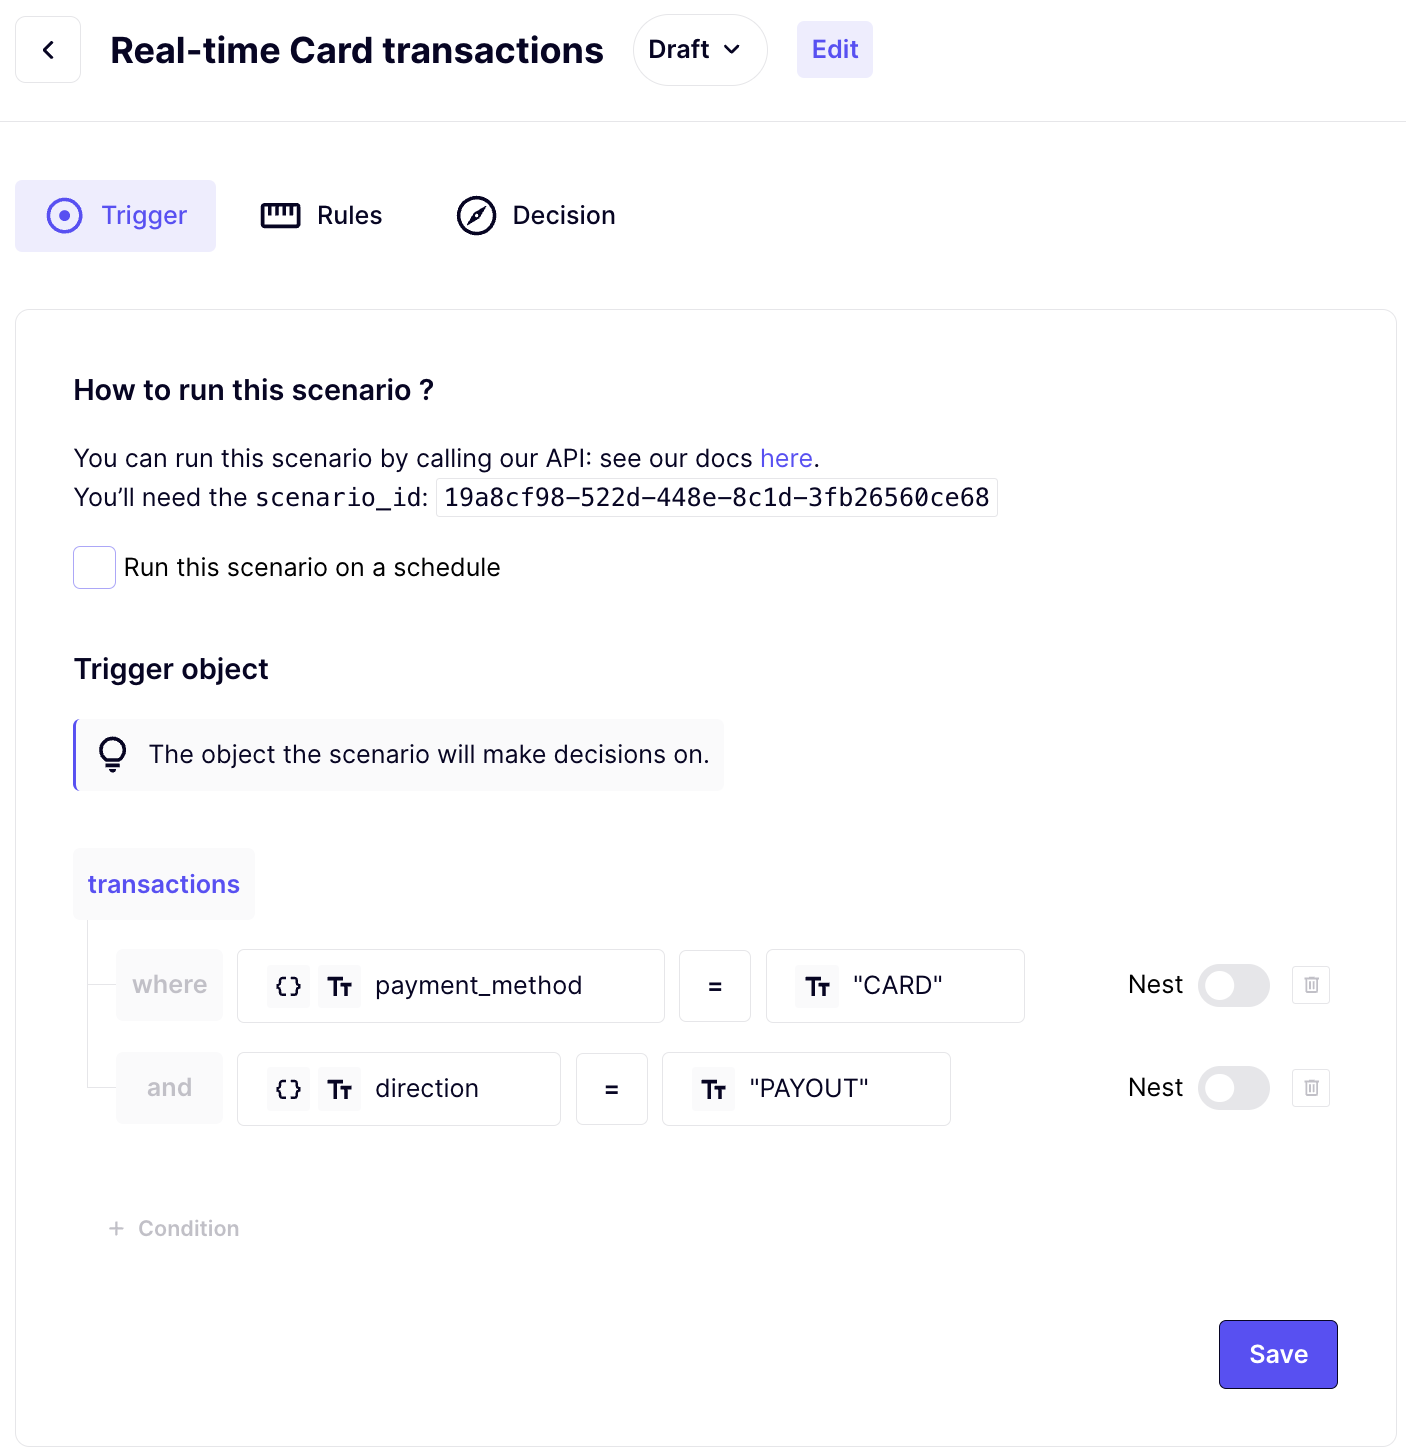
Before making decisions, let's build a scenario dedicated to handling real-time decisions. Let's check outgoing (direction = PAYOUT) card (payment_method = CARD) transactions:
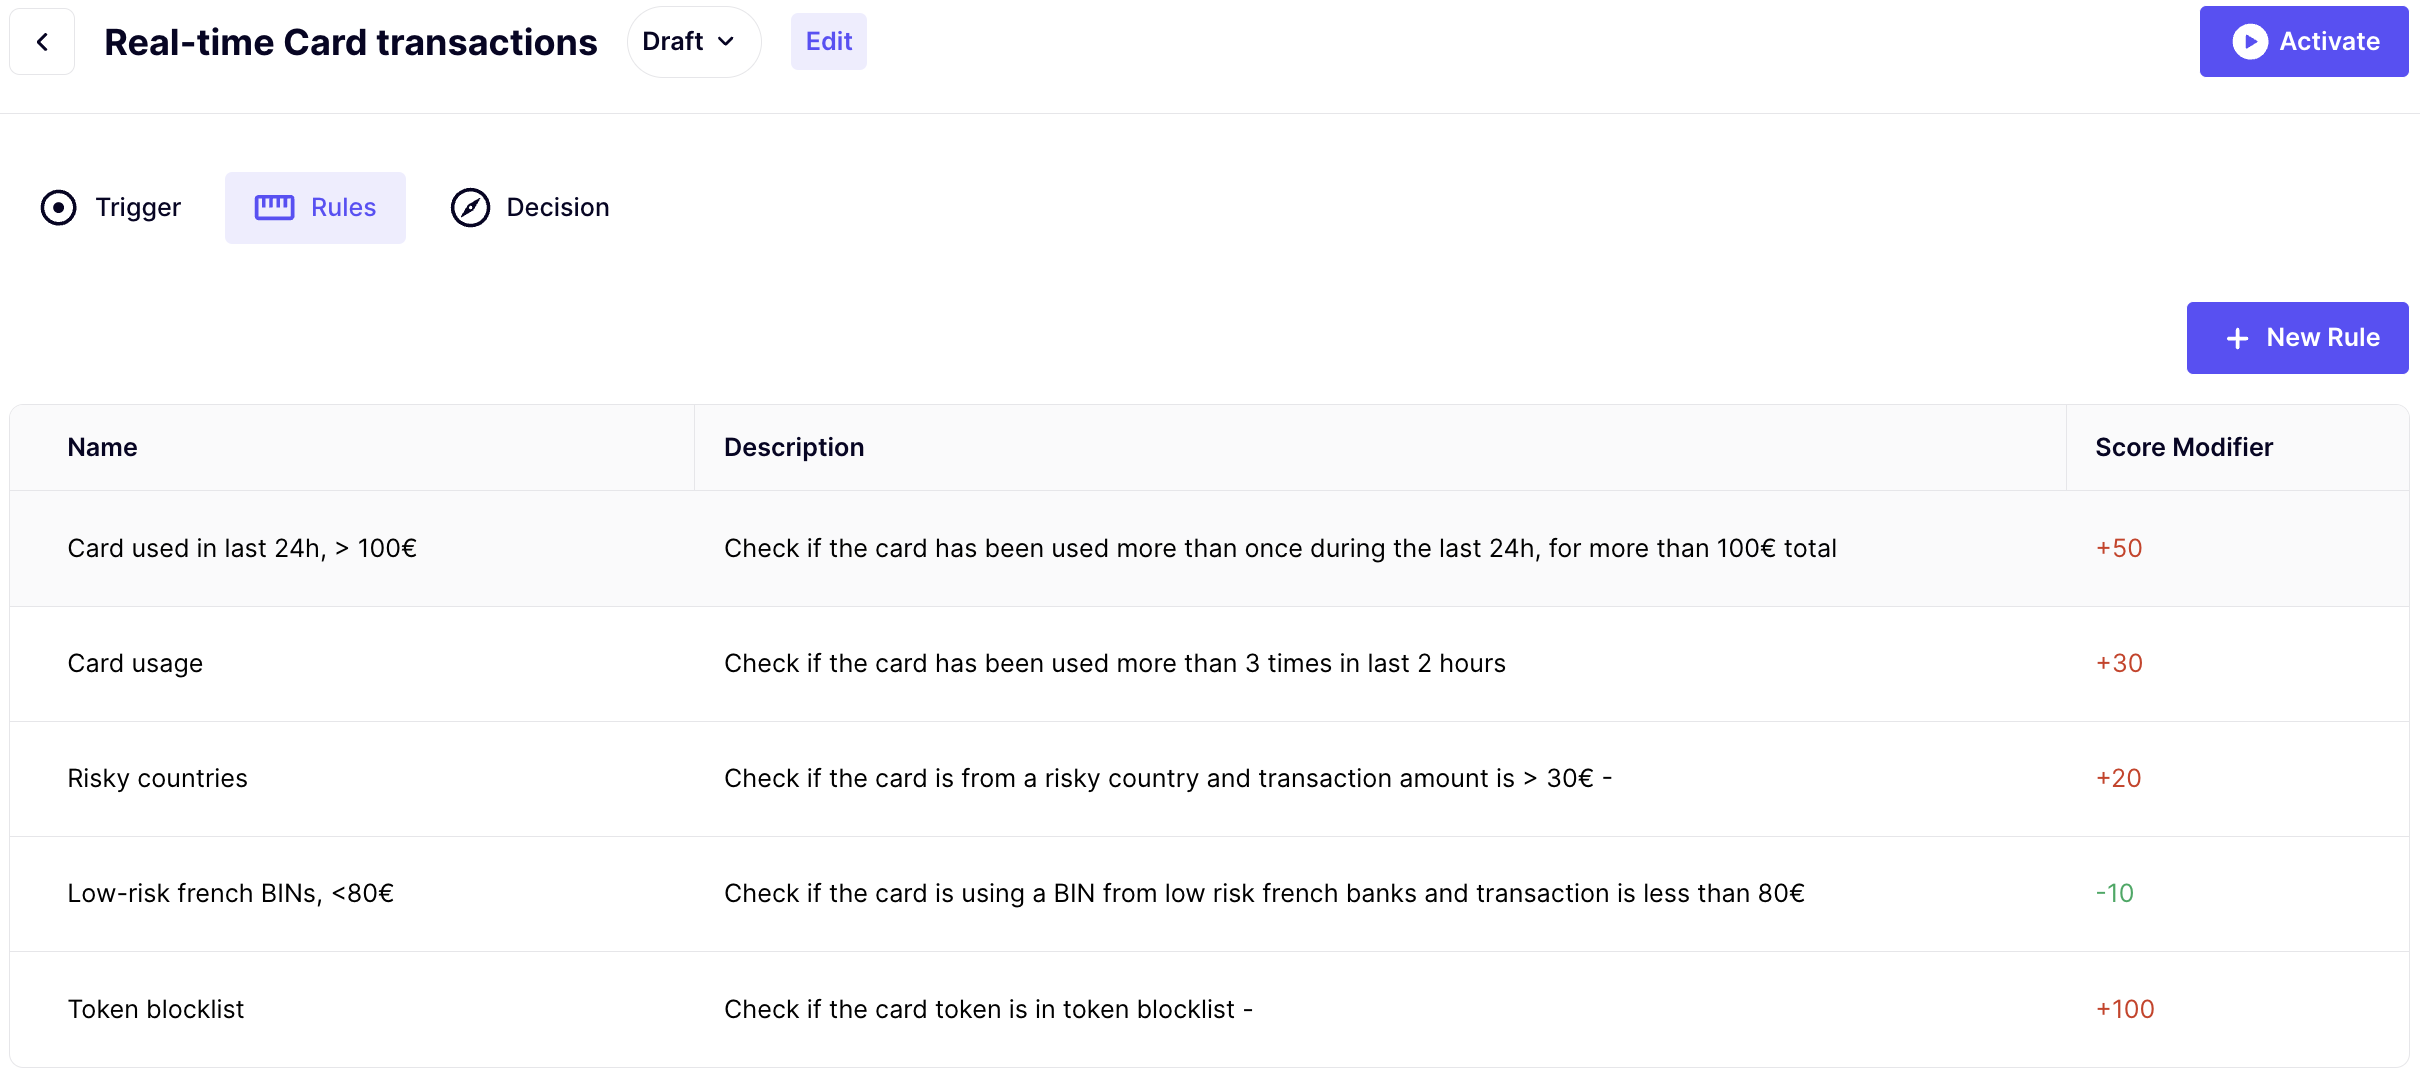
Following what we've done previously, let's create the following rules:
- Check if the card token is in token blocklist
- We'll need to maintain a list of known blocked tokens
- Check if the card has been used more than once during the last 24h, for more than 100€ total
- Check if the card is from a risky country and transaction amount is > 30€
- We'll need to maintain a list of known risky countries
- Check if the card is using a BIN from low risk french banks and transaction is less than 80€
- We'll need to maintain a list of known low risk bank BINs
- This will be a negative score rule, it denotes a lower risk
- Check if the card has been used more than 3 times in last 2 hours
Finally, we'll define the following outcomes. This time, we're mapping each of the outcomes to a specific action in our system :
- 0-20 : approve (this will trigger a frictionless transaction approval)
- 20-80 : review (this will trigger a 3DS challenge)
- Over 80 : decline (this will decline the transaction)
Real-time decisions
To make decisions in real-time, you'll (once again) need the help of your dev team. They'll probably want to look at our public decisions API documentation. As with the previous step, there's also a data-model-aware documentation available in the Marble UI.
At that point, you'll likely need to build the integration in your core banking.
Let's build on the scenario we just created :
- A card authorization request reaches your product
- Your product goes through the existing required checks (ie, does the user have enough funds, etc...)
- You create a decision in Marble, using the decisions API
- Depending on the decision's outcome, you trigger specific actions in your product. As a reminder, her'es what we intended when building the scenario :
- approve will trigger a frictionless transaction approval
- review will internally trigger a 3DS challenge
- decline will internally decline the transaction
Using this scenario, the real-time decision is more complex to setup, but you typically handle the response programatically, in real-time, so there is no need to go further.
Conclusion
Congratulations, you have now successfully gone through a full-fledge Marble implementation !
From here, you can always edit your scenarios while keeping a clear audit trail, and you can also have a look at our case manager, which allows you to handle manual reviews on accounts or transactions.
Updated 11 months ago